My DIY Place
  • Home
    • Terms & Conditions
    • Privacy Policy
  • Blog
  • Crafts, Recipes, DIY
    • In The Kitchen / Recipes >
      • Apps & Sides
      • Cupcakes & Cakes
      • Desserts
      • Dinners & Meals
      • Drinks
      • Snacks
      • Vegetarian
    • Pets
    • Health & Beauty
    • Lawn & Garden
    • Kids Crafts
    • Home Decor
    • Recycled Crafts
    • Holidays & Occasions >
      • Christmas
      • July 4th
      • Valentine's Day
      • Baby Shower
      • Halloween
      • Thanksgiving
      • Birthday
      • Easter
      • St. Patrick's Day
    • Get Organized!
    • Crafts & How To
    • Party Ideas
    • Gift Ideas
  • Work From Home
    • Work From Home Companies
    • Direct Sales Opps
    • Articles
  • Contact

halloween lanterns

Picture
Materials

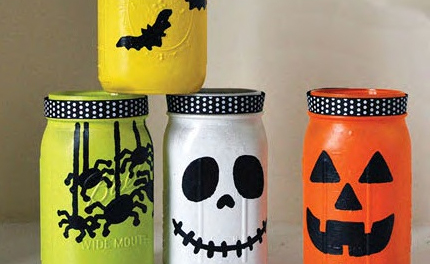
Glass mason jars, washed and dried

Spray paint in desired colors

Acrylic paint, black

Paint brush, small enough to paint detailed designs

Patterned ribbon

Tea lights

Step 1

Turn the jars upside down on your painting surface and apply several coasts of spray paint according to the manufacturer’s instructions. Let the jars dry completely.

Step 2

Paint your chosen designs on the outside of the jars with black acrylic paint.  (It may take a couple of coats to get a solid color.) Our favorites? Pumpkin faces, spiders, ghost eyes and bats. Let dry completely.

Step 3

Optional: Apply a coat of high-gloss varnish to the outsides of the jars. To finish your lanterns, glue a patterned ribbon around the top and place a tea light in them to add a nice glow to your holiday party. This is a great project for kids -- until you put the candle inside. Then please keep out of reach of children.

Source:  http://www.homerehabonline.com/home-decor-projects/diy-decorating-halloween-lanterns/index.html#axzz2Wa9Wl1z1
Powered by Create your own unique website with customizable templates.